
 打赏
打赏
Godot 免费跨平台游戏引擎 (四、脚本GDScript)
看官方文档,也不是一两篇文章能解决的。看完文档还得消化、实践、技巧,实例。
第一个游戏将学习编辑器的工作原理、构建项目以及如何构建2D游戏。
游戏最终效果,在避开敌人,保持尽可能长的时间。

下载相关素材,设置项目窗口大小480x720
组织项目
这个项目有3个独立的场景:Player、Mob、HUD,将它们组合到游戏的Main场景中。
Player场景
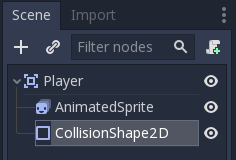
节点结构
添加新节点,然后向场景中添加一个Area2D节点,先忽略警告。
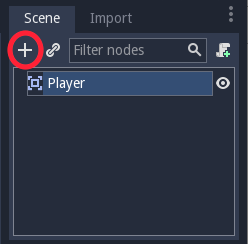
使用Area2D节点,我们可以检测物体是否跑到Player之中,或者与Player发生交叠。修改节点名为Player。
为了确保不意外移动它或者调整大小,将其锁定并保存场景。选择节点后,点击锁右侧图标,它的工具提示显示“确保对象的子级不可选择“。
精灵动画
Player节点添加AnimatedSprite子节点,它将处理外观和动画。此节点需要一个SpriteFrames资源,它是一个动画列表。
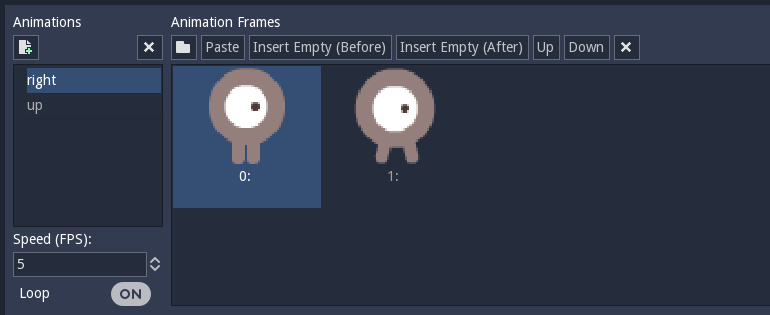
在属性检查器面板中找到Frames属性,新建SpriteFrames,然后点击编辑,进入SpriteFrames面板。

左方是动画列表,将默认动画改名为right,然后添加第二个动画,名为up。每个动画添加两个图片。
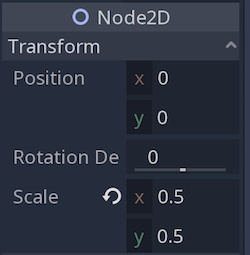
Player图像相对于游戏窗口来说有点大,需要缩小比例。点击AnimatedSprite节点,将Scale属性设置为0.5(在Node2D标题Transform下)。
最后添加一个CollisionShape2D子节点,用于解决碰撞。在属性检查器中的形状旁,新建CapsuleShape2D,使用两个手柄,调整形状以覆盖住精灵
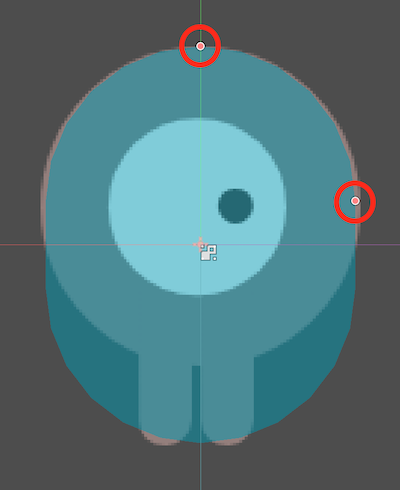
完成后的样子
移动Player
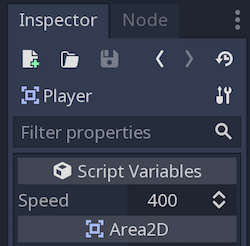
现在需要添加内置节点不具备的功能,因此需要添加脚本。
extends Area2D

export var speed = 400
var screen_size
export关键字,让此变量允许在属性检查器中设置其值。在面板中修改的值,将覆盖脚本中已写入的值。
在节点进入场景时,_ready()函数被调用,这时候适合获取窗口大小
func _ready():
    screen_size = get_viewport_rect().size
_process()函数在每一帧都被调用,因此可以使用它来更新经常变化的游戏元素。对于Player,我们需要:检查输入、沿给定方向移动、播放适当的动画
首先,检查输入–Player是否按下了键。此游戏中,我们有4个方向的输入要检查。
func _process(delta):
	var velocity = Vector2()
	if Input.is_action_pressed("ui_right"):
		velocity.x += 1
	if Input.is_action_pressed("ui_left"):
		velocity.x -= 1
	if Input.is_action_pressed("ui_down"):
		velocity.y += 1
	if Input.is_action_pressed("ui_up"):
		velocity.y -= 1
	if velocity.length() > 0:
		velocity = velocity.normalized() * speed
		$AnimatedSprite.play()
	else:
		$AnimatedSprite.stop()
这里使用了Input.is_action_pressed来检测各个按键。
为了解决同时按右和下,移动速度过快的情况,对速度进行归一化(normalize)。
以上代码不会使Player真的动起来。视觉上,它只是有了play和stop。
$是get_node()的简写。因此$AnimatedSprite.play()和get_node(“AnimatedSprite”).play()相同。
clamp()函数,可以将值限定在一个范围。这个函数值得pygame学习一下,判断起来就简单了。
在下方添加运动范围。delta是帧长度:完成上一帧所花费的时间。使用这个值可以保证移动不会被帧率变化影响。
	position += velocity * delta
	position.x = clamp(position.x,0,screen_size.x)
	position.y = clamp(position.y,0,screen_size.y)
现在,Player可以按范围进行移动了。position是指当前节点的位置。不过怪异的是,它只是显示了向上的动化(就那两帧而已)。
现在我们需要根据方向来决定播放哪个动画。通过2级动画的水平和垂直翻转,可以实现四个方向的移动动画。
if velocity.x != 0:
    $AnimatedSprite.animation = "right"
    $AnimatedSprite.flip_v = false
    # See the note below about boolean assignment
    $AnimatedSprite.flip_h = velocity.x < 0
elif velocity.y != 0:
    $AnimatedSprite.animation = "up"
    $AnimatedSprite.flip_v = velocity.y > 0
然后在启动时,将Player隐藏起来,在_ready()中添加hide()
准备碰撞
在脚本顶部extends Area2d后,添加signal hit。这里定义了一个称为hit的自定义信号,当Player与敌人碰撞时,我们将使其Player发出信号。
使用Area2D来检测碰撞。
选中Player节点,查看Player可以发出的信号列表:

在上方,我们还看到了自定义信号hit。点击body_entered(Object body)信号。当身体与Player接触时会发出此信号。
func _on_Player_body_entered(body):
    hide()  # Player disappears after being hit.
    emit_signal("hit")
    $CollisionShape2D.set_deferred("disabled", true)
隐藏Player,然后触发hit信号。
如果在引擎碰撞过程中禁用碰撞形状,则可能导致错误。使用set_deferred()允许让Godot等待直到安全为止,再去禁用形状。
手动添加一个函数,用于开始新游戏时重置Player
func start(pos):
    position = pos
    show()
    $CollisionShape2D.disabled = false
Enemy场景
怪物将在屏幕的边缘随机生成,并在随机的方向上沿直线移动,然后离开屏幕时消失。
节点设置
新建Mob场景,使用如下节点:
RigidBody2D(改名为Mob) AnimatedSprite CollisionShape2D VisibilityNotifier2D (改名为Visibility)
同Player一样,将Mob依然设置为子级不可选择。
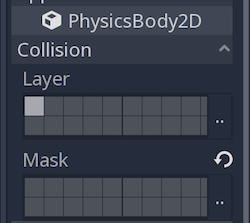
在RigidBody2D属性中,将Gravity Scale(重力程度)设置为0,这样怪物没有重力,不会向下坠。在PhysicsBody2D部分,点击Mask属性并去掉第一个复选框的勾选。确保怪物不会彼此碰撞。
与Player一样设置AnimatedSprite,有3个动画fly、swim、walk。将属性Loop设置为ON,调整fly为3FPS,swim和walk为4FPS。
为碰撞添加CapsuleShape2D,将Node2D下Rotation Degress属性设置为90,再让形状与图形对齐。
敌人的脚本
将脚本添加到Mob下
extends RigidBody2D

export var min_speed = 150
export var max_speed = 250
var mob_types = ["walk", "swim", "fly"]

func _ready():
    $AnimatedSprite.animation = mob_types[randi() % mob_types.size()]
最后一步是让怪物在离开屏幕时自己删除。连接Visibility节点的screen_exited()信号
func _on_Visibility_screen_exited():
    queue_free()
Main场景
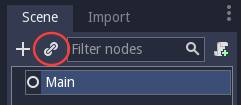
创建Main场景,实例化Player。
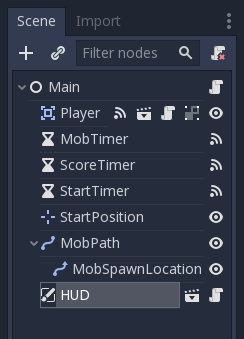
为Main添加子节点:
Timer(改名MobTimer):控制怪物产生的频率
Timer(名ScoreTimer):每秒增加分数
Timer(名StartTimer):在开始之前给出延迟
Position2D(名StartPosition): 指示Player的起始位置
设置每个Timer节点的Wait Time属性:
MobTimer: 0.5
ScoreTimer:1
StartTimer:2
此外,将StartTimer的One Shot设置为On,将StartPosition节点的Position设置为(240,450)
生成怪物
在Main下面添加Path2D子节点,改名为MobPath。
选择中间的添加点,顺时针点击左上,右上,右下,左下四点,注意以顺时针顺序,否则小怪会向外而非向内生成。

在图像上放置点4后,点击闭合曲线按钮,将完成曲线连接。
再在MobPath后面添加PathFollow2D子节点,改名为MobSpawnLocation。
Main脚本
extends Node

export (PackedScene) var Mob
var score

func _ready():
    randomize()
使用export (PackedScene)来允许在界面上选择要实例化的Mob场景。
将每个Timer节点(StartTimer.ScoreTimer.MobTimer)的 timeout() 信号连接到 main 脚本。
StartTimer 将启动其他两个计算器。 ScoreTimer 将使得分增加1.
func _on_StartTimer_timeout():
    $MobTimer.start()
    $ScoreTimer.start()

func _on_ScoreTimer_timeout():
    score += 1
在 _on_MobTimer_timeout() 中,创建一个mob实例,沿着 Path2D 随机选择一个起始位置,然后让 mob 移动。 PathFollow2D 节点将沿路径移动,因此会自动旋转,所以将使用它来选择怪物的方向及位置。
func _on_MobTimer_timeout():
    # 在Path2D上选择一个随机位置.
    $MobPath/MobSpawnLocation.set_offset(randi())
    # 创建一个Mob实例,添加到场景。
    var mob = Mob.instance()
    add_child(mob)
    # 设置mob垂直路径的方向
    var direction = $MobPath/MobSpawnLocation.rotation + PI / 2
    # mob的位置随机
    mob.position = $MobPath/MobSpawnLocation.position
    # 随机方向
    direction += rand_range(-PI / 4, PI / 4)
    mob.rotation = direction
    # 设置速度和方向
    mob.linear_velocity = Vector2(rand_range(mob.min_speed, mob.max_speed), 0)
    mob.linear_velocity = mob.linear_velocity.rotated(direction)
注意 在需要角度的函数中,GDScript使用弧度而不是角度。可以使用deg2rad()和rad2deg()在角度和弧度之间转换。
HUD
最后一步就是界面,用于显示得分,游戏结束消息,以及重启。
创建一个新场景,添加名为HUD的CanvasLayer节点。
CanvasLayer节点允许我们在游戏其余部分上面的层上绘制UI元素,以便显示的信息不会被任何游戏元素覆盖。
HUD显示以下信息:得分,由ScoreTimer更改;一条消息,例如Game Over或Get Ready;一个Start按钮来开始游戏。
创建以下HUD子节点:
Label -> ScoreLabel
Label -> MessageLabel
Button -> StartButton
Timer -> MessageTimer
对它们修改字体,似乎都要先输入。在自定义字体选项中,选择新建DynamicFont,然后在Font/Font Data选项中选择Load字体。再设置字体Size。根据实际需求,修改它们的对齐方式,边距等。
将脚本添加到HUD
extends CanvasLayer

signal start_game

func show_message(text):
     $MessageLabel.text = text
     $MessageLabel.show()
     $MessageTimer.start()
这是用来显示信息的。在MessageTimer中,将Wait Time设置为2,One Shot设置为On。
func show_game_over():
	show_message("Game Over")
	yield($MessageTimer,"timeout")
	$MessageLabel.text = "Dodge the\nCreeps!"
	$MessageLabel.show()
	yield(get_tree().create_timer(1),"timeout")  #等待2秒钟再显示Start按钮
	$StartButton.show()

func update_score(score):
    $ScoreLabel.text = str(score)
连接 MessageTimer 的 timeout() 信号和 StartButton 的 pressed() 信号
func _on_StartButton_pressed():
    $StartButton.hide()
    emit_signal("start_game")

func _on_MessageTimer_timeout():
    $MessageLabel.hide()
将HUD场景连接到Main场景
在Main场景中实例化HUD场景。
现在需要将 HUD 功能与 Main 脚本连接起来。这需要在 Main 场景中添加一些内容:
在 Node 选项卡中,将HUD的 start_game 信号连接到主节点为的 new_game() 函数。
在 new_game() 函数中,更新分数并显示 Get Ready 消息
$HUD.update_score(score)
$HUD.show_message("Get Ready")
在 game_over() 中调用相应的 HUD 函数
$HUD.show_game_over()
最后添加代码到_on_ScoreTimer_timeout() 以保持不断变化的分数的同步显示
$HUD.update_score(score)
删除旧的小怪
直到游戏结束开始新游戏,上次游戏的怪物仍显示在屏幕上。使用 HUD 节点为已经发出的 start_game 信号来移除它们。
向 Mod.gd 添加一个新函数。
func _on_start_game():
     queue_free()
然后在 Main.gd 中, _on_MobTimer_timeout() 函数末尾,添加新行:
$HUD.connect("start_game", mob, "_on_start_game")
该行告诉新的Mob节点,通过运行它的_on_start_game()函数来响应HUD节点为发出的任何start_game信号。
完善
背景
在 Main 下添加一个ColorRect节点,选择一个color,并拖动大小,使其覆盖屏幕。
音效
添加两个 AudioStreamPlayer 子节点到Main下,将其中一个命名Music,另一个DeathSound。点击 Stream 属性,选择加载音频。
在 new_game() 函数中添加 $Music.play(),在 game_over() 函数中添加 $Music.stop()和$DeathSound.play()。
键盘快捷键
将 StartButton 对应一个按键。 选择 StartButton 的快捷键属性,新建快捷键,新建InputEventAction,点击新建 InputEvent,在编辑中 Action 属性键入 ui_select。这是与空格键关联的默认输入事件。
)
终于完成了。脚本还是比较好理解,有Python的风格。需要链接各个功能函数比较麻烦。不是一次性成功,对比了官方的成品,一步步修改,还是完成了第一个游戏。
导出Linux文件,一共两个文件,包含一个扩展名为pck的文件,估计是资源包。总大小56.3MB。源文件中,资源文件是16MB左右,我使用了中文字体,最大的是微软字体文件。
重新设置英文字体,pck文件就减小了。
在导出时,勾选Embed Pck,则完全打包为一个可执行文件。总大小没啥变化。
导出的Win版本比Linux小3M左右。
在ubuntu下,使用upx压缩40MB减小到了12MB,基本比较可以了。
渐进教程也接下来讲了关于导出的相关。
导出
为了也适用于手机或平板,要用触摸事件来模拟相关事件。
在“项目设置”的Input Devices->Pointing下,勾选Emulate Touch From Mouse。
保持游戏等比缩放,在项目设置Display->Window->Stretch,Mode设置为2D,Aspect纵横比设置为keep。Handheld->Orientation为portrait。

修改Player.gd脚本来改变输入方式,发配合手机或平板。
extends Area2D

signal hit

export var speed = 400
var screen_size
# Add this variable to hold the clicked position.
var target = Vector2()

func _ready():
    hide()
    screen_size = get_viewport_rect().size

func start(pos):
    position = pos
    # Initial target is the start position.
    target = pos
    show()
    $CollisionShape2D.disabled = false

# Change the target whenever a touch event happens.
func _input(event):
    if event is InputEventScreenTouch and event.pressed:
        target = event.position

func _process(delta):
    var velocity = Vector2()
    # Move towards the target and stop when close.
    if position.distance_to(target) > 10:
        velocity = (target - position).normalized() * speed
    else:
        velocity = Vector2()

# Remove keyboard controls.
#    if Input.is_action_pressed("ui_right"):
#       velocity.x += 1
#    if Input.is_action_pressed("ui_left"):
#        velocity.x -= 1
#    if Input.is_action_pressed("ui_down"):
#        velocity.y += 1
#    if Input.is_action_pressed("ui_up"):
#        velocity.y -= 1

    if velocity.length() > 0:
        velocity = velocity.normalized() * speed
        $AnimatedSprite.play()
    else:
        $AnimatedSprite.stop()

    position += velocity * delta
    # We still need to clamp the player's position here because on devices that don't
    # match your game's aspect ratio, Godot will try to maintain it as much as possible
    # by creating black borders, if necessary.
    # Without clamp(), the player would be able to move under those borders.
    position.x = clamp(position.x, 0, screen_size.x)
    position.y = clamp(position.y, 0, screen_size.y)

    if velocity.x != 0:
        $AnimatedSprite.animation = "right"
        $AnimatedSprite.flip_v = false
        $AnimatedSprite.flip_h = velocity.x < 0
    elif velocity.y != 0:
        $AnimatedSprite.animation = "up"
        $AnimatedSprite.flip_v = velocity.y > 0

func _on_Player_body_entered( body ):
    hide()
    emit_signal("hit")
    $CollisionShape2D.set_deferred("disabled", true)
设置主场景为Main.tscn。
导出模板是为每个平台预先编译的,不带编辑器的引擎优化生皮本。
这里也讲到了关于Android设备的导出方法,它需要下载一些Android自身的SDK。
可惜我没能成功导出HTML5,提示无法打开导出模板:~/.local/share/godot/templates/3.2.stable/webassembly_debug.zip。待以后解决吧。
2020.3.19
有网友做了更多的汉化,可以加群下载3.2.1的中文汉化版。顺便也试了一下导出H5。
导出的文件使用了wasm,所以速度上应该不是问题。最大的两个文件,与其它平台的导出类似:一个资源文件pck,一个程序文件wasm。此游戏导出合计22MB左右。一个简单的Web服务开启后访问,顺序运行。本地点击打开则不行,主要是wasm加载不了。